Build a Work Queue Slack App with TypeScript
- Build the app
- Deploy to production
A Slash Command Slack App lets Slack users interact with an application using a Slash Command (/<command>) in a Slack channel. When you build a Slash Command Slack App, you might need to persist data between interactions. Traditionally, you connect to a database to do this. With a Temporal Application, you can store that data directly within a function that's resilient to process crashes and can be horizontally scaled.
In this tutorial you build a Work Queue Slash Command Slack App. Imagine an organization with many teams. Each team provides a service to the organization and has a Slack channel. While a common task tracking system might be in place, many micro-tasks don't warrant a full task entry. By the end of this tutorial, you will have built a Slash command Slack App to submit and manage general work requests in a Slack channel that responds to interactive block elements.
Prerequisites
Before starting this tutorial, set up a local development environment for Temporal and TypeScript.
Review or complete the Run your first Temporal application with the TypeScript SDK tutorial.
Overview of the application
The system includes a Slack Workspace, a Slack App, a Temporal Service, and a Temporal Application. Traditionally, you would need a database to maintain the state of your Slack App between interactions. However, by using Temporal, you can maintain the state directly within a Temporal Application. The Workflow maintains state even if the process crashes - and can rebuild and resume on a different process on a different machine.
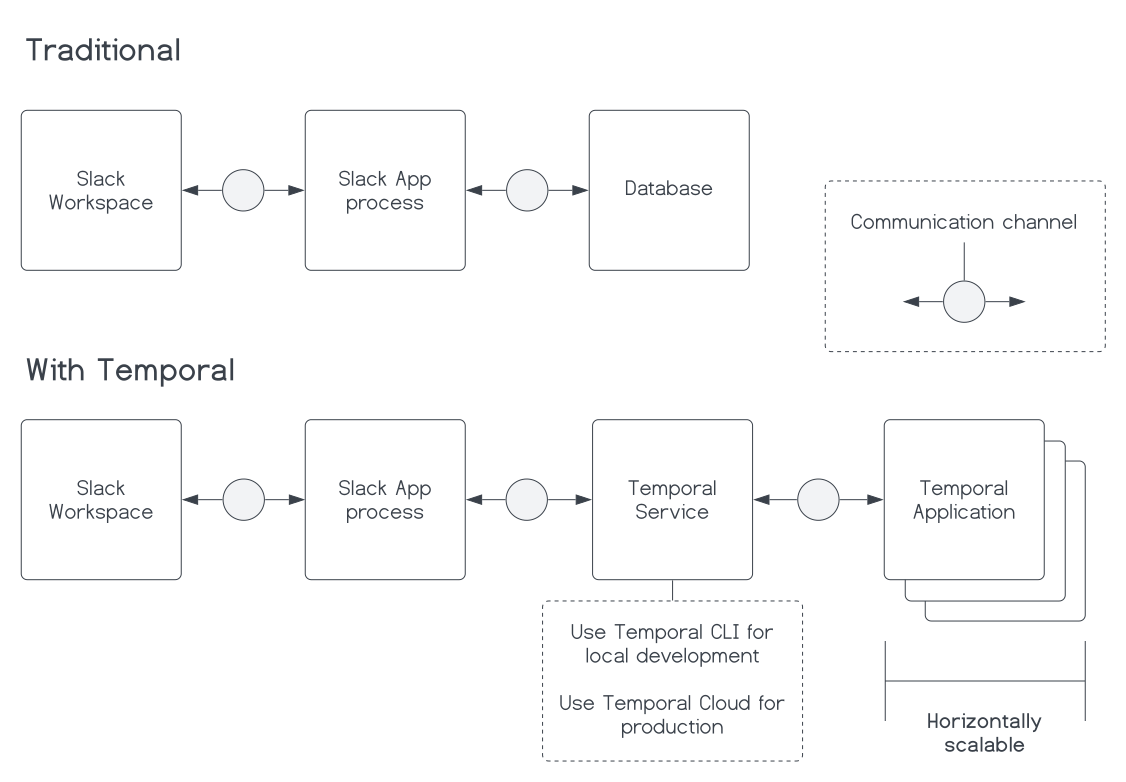
During development, you will manage your Temporal Application, the Slack bot, and the Temporal Service. In production, if you use Temporal Cloud as your Temporal Service, you only need to deploy the Temporal Application. Your Temporal Application replaces an entire database with less than 70 lines of code.
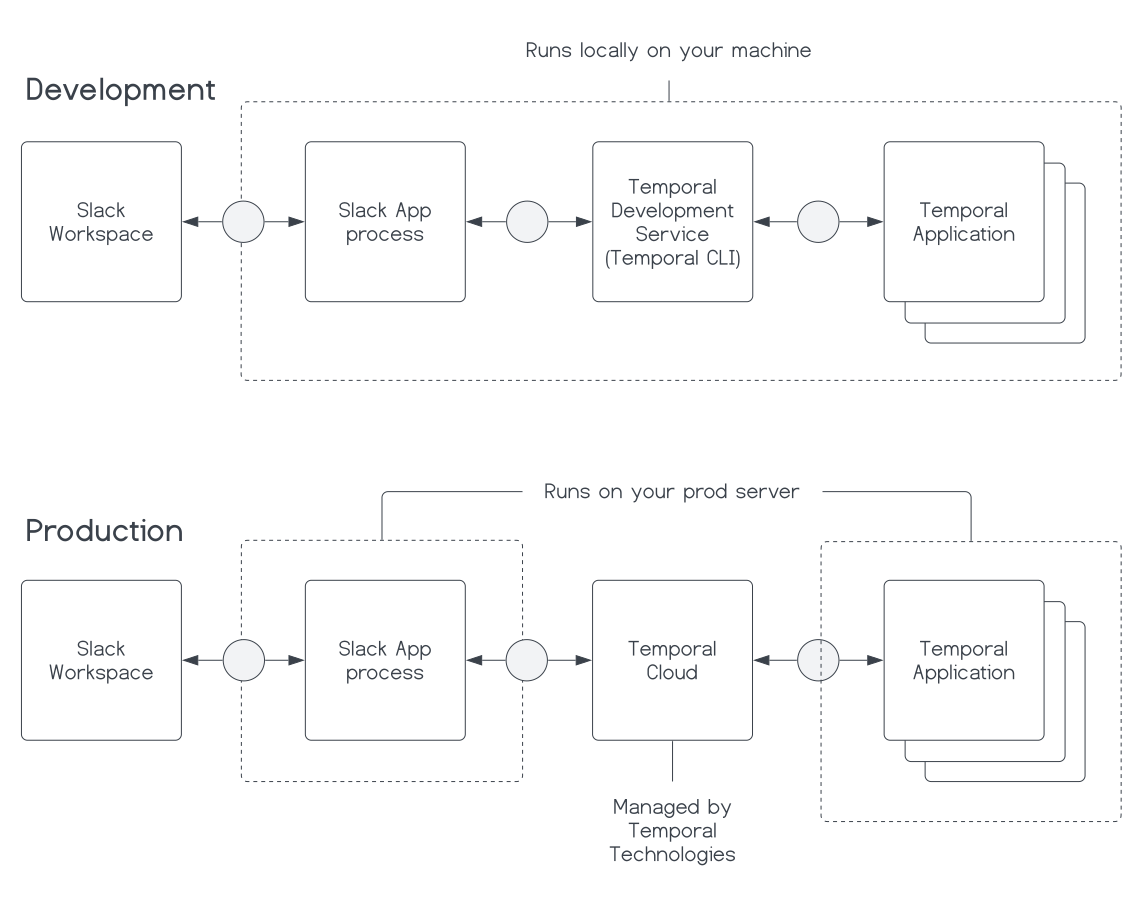
To use Temporal Cloud in production, see the Deploy your application to DigitalOcean part of the tutorial.
Functional requirements:
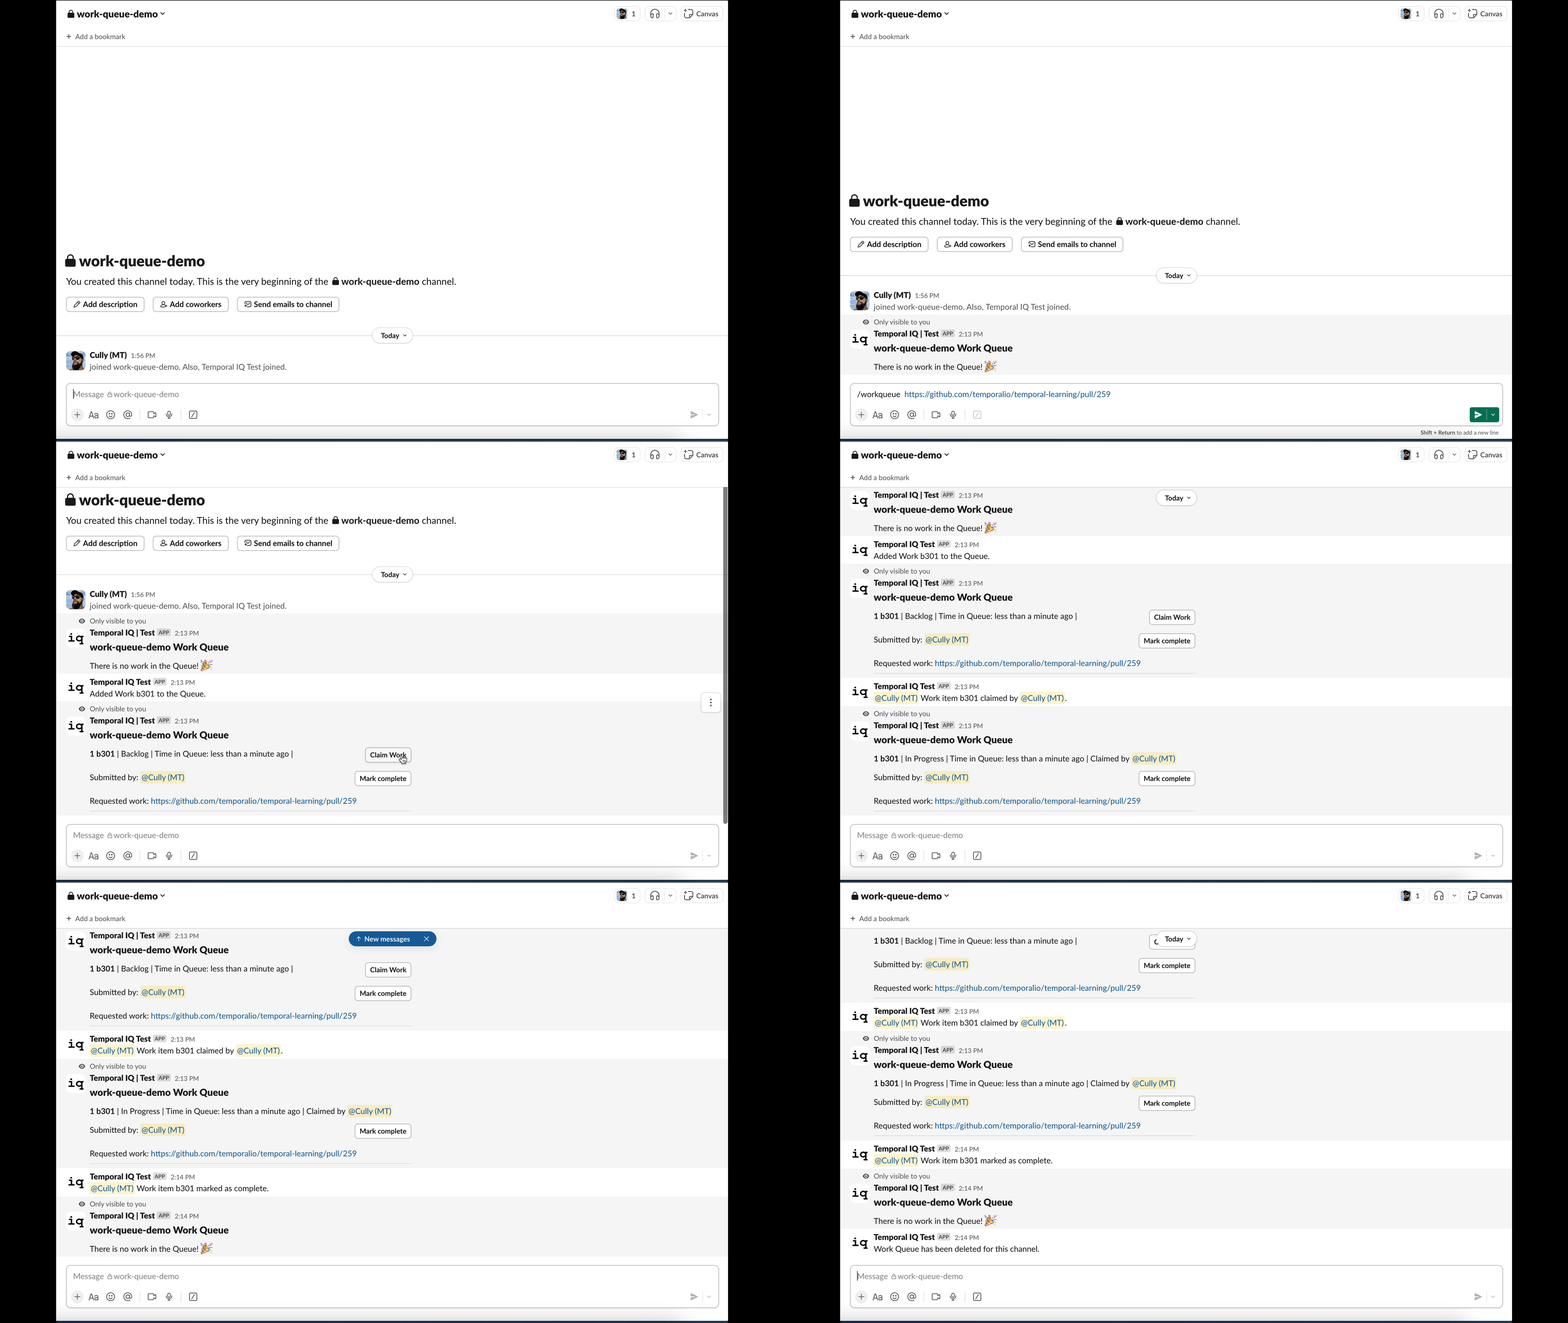
- A user can submit a work request with a Slash Command.
- A user can see all the work requests for the channel with a Slash Command.
- A user can click a button to claim a work request.
- A user can click a button to mark a work request as complete.
- A user can delete the Work Queue for the channel with a Slash Command.
Create a new Slack App configuration
Before you write any code, configure your application with Slack to get your API tokens. Go to https://api.slack.com/apps?new_app=1 and create an app "From scratch." Name the app and select a workspace.
Enable Socket Mode. Under Settings, select Socket Mode and toggle ON socket mode.
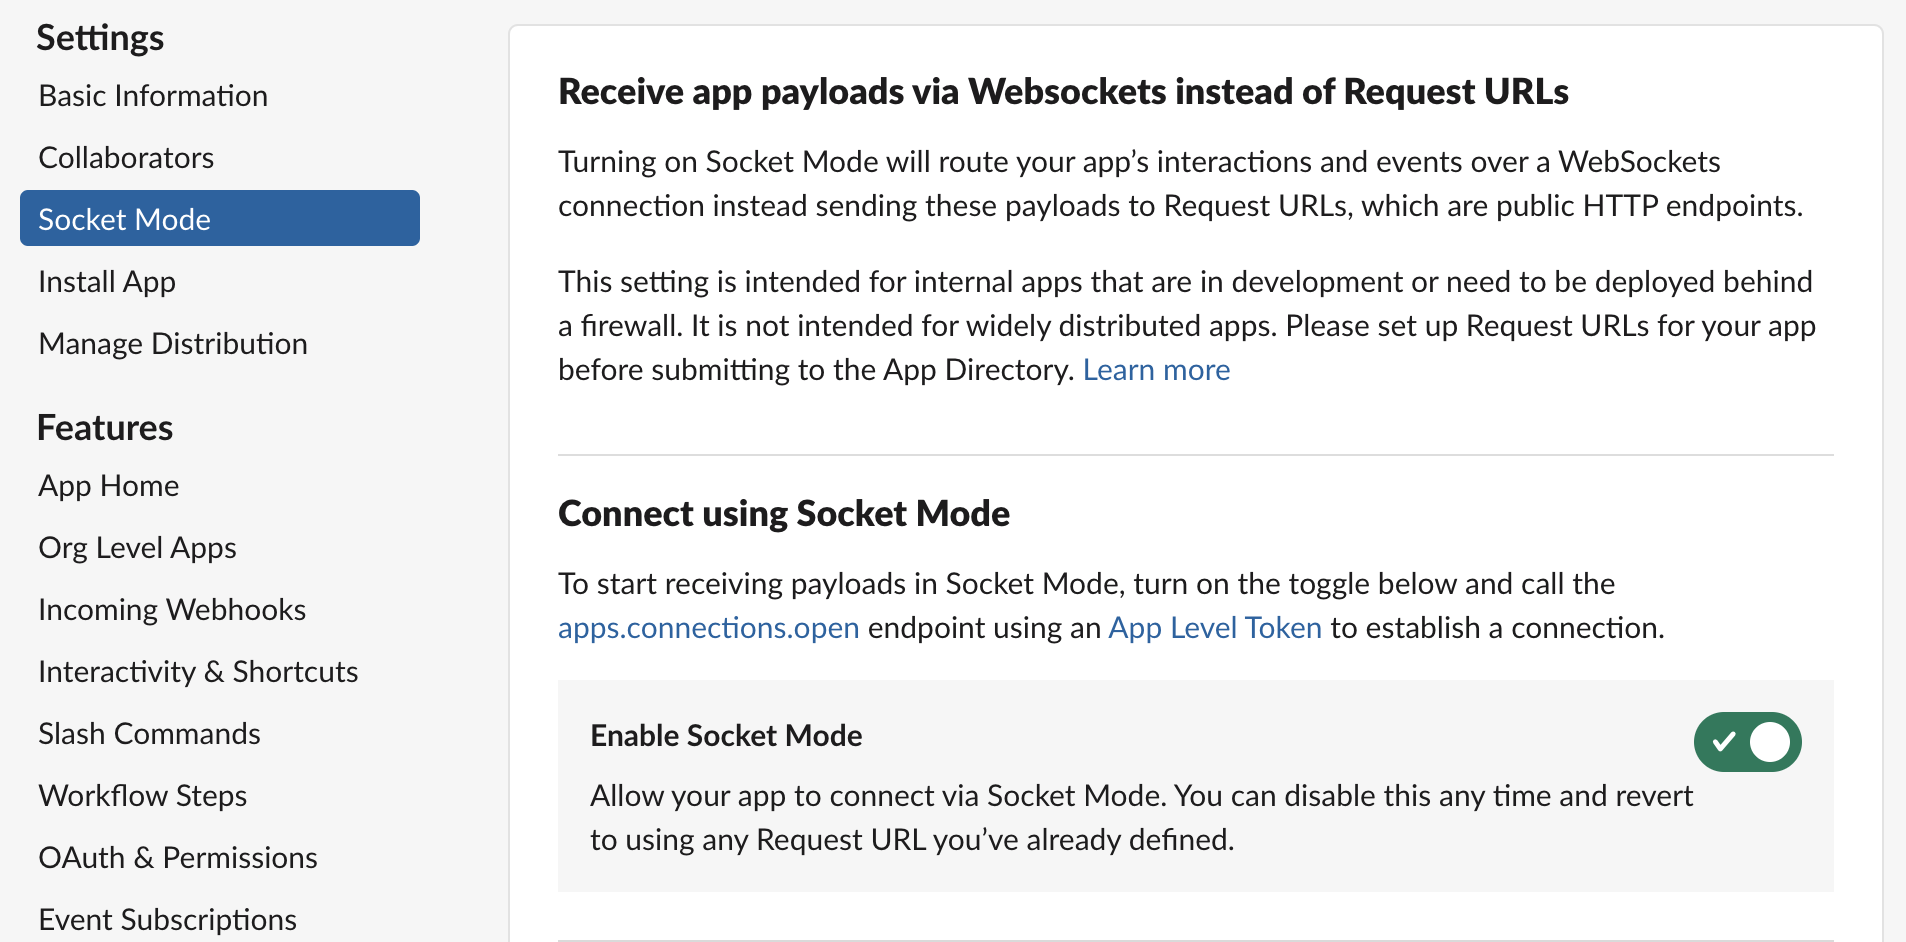
Socket Mode means you don't have to set up and expose an HTTP server to receive events from Slack. Slack gives you an application token starting with xapp under App-Level Tokens in Basic Information.
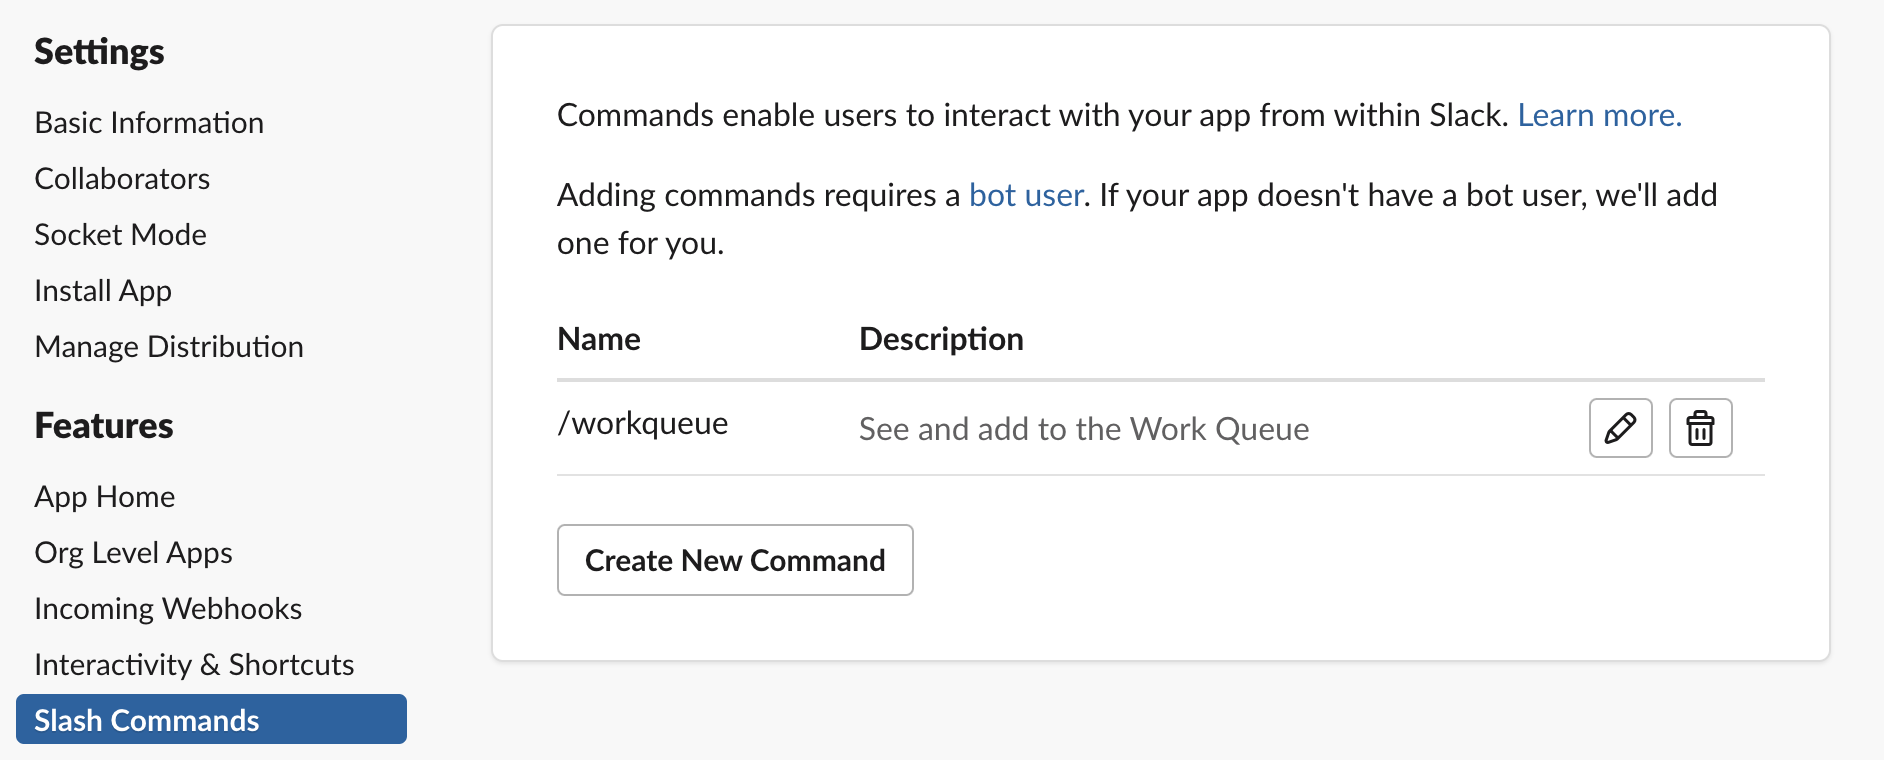
Next, create a Slash Command. Select Slash Commands in the sidebar, click Create New Command, and add a new command for /workqueue.
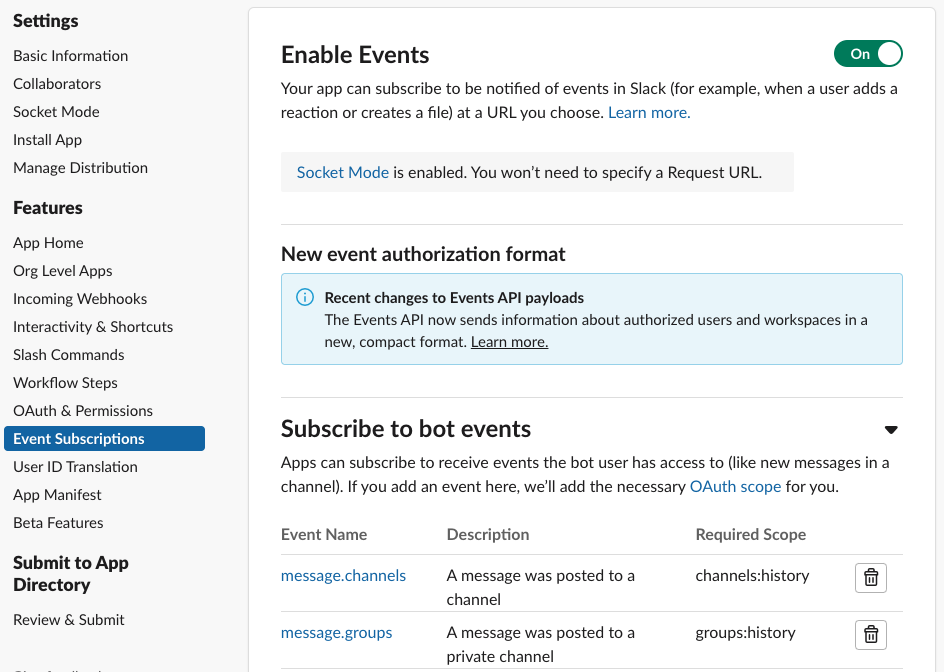
Subscribe to Events. Under Features, select Event Subscriptions, ensure Enable Events is ON, and add subscriptions for:
message.groupsmessage.immessage.channels
Set up OAuth & Permissions. Enable the following Bot Token Scopes:
channels:historychannels:readchat:writegroups:historygroups:readim:historympim:history
Install the app in Slack via Install App. Record the Signing Secret, App Level Token, and Bot User OAuth Token for later use.
Create TypeScript projects for the Slack App
You need two TypeScript projects for this Slack application: temporal-application and bot. Create a new TypeScript project for the bot:
mkdir bot
cd bot
npm init
tsc --init
This tutorial assumes the following structure:
-- your-workqueue-slack-app
  |-- temporal-application # This is the Temporal Application project
  |   |-- .env
  |   |-- src
  |   |   |-- workflows
  |   |   |   |-- workqueue.ts
  |   |   |-- index.ts
  |   |-- package.json
  |   |-- tsconfig.json
  |-- bot # This is the Slack bot project
  |   |-- .env
  |   |-- src
  |   |   |-- index.ts
  |   |-- package.json
  |   |-- tsconfig.json
  |-- common-types # These types are shared by both projects
      |-- types.ts
In the temporal-application project, install dependencies:
npm install @temporalio/worker dotenv path
npm install --save-dev typescript ts-node @types/node
In the bot project, install dependencies:
npm install @slack/bolt @slack/web-api @temporalio/client crypto date-fns dotenv
npm install --save-dev typescript ts-node @types/node
Slack bot environment variables
Grab the Slack credentials and in the project root of the bot application, add them to a .env file:
SLACK_SIGNING_SECRET="<slack-signing-secret>"
SLACK_BOT_TOKEN="<slack-bot-token>"
SLACK_APP_TOKEN="<slack_app_token>"
SLACK_WORKSPACE="<slack_workspace>"
ENV="dev"
The ENV variable is prepended to the Task Queue name for your Temporal Application. This lets you use the same Temporal Namespace locally and in production without worrying about production Tasks getting executed on your local machine.
Temporal Application environment variables
In the temporal-application project, make sure you have a .env file with the ENV variable:
ENV="dev"
Define the common types used across the application. Create a file types.ts in the common-types directory:
export interface WorkqueueData {
  id: string;
  timestamp: string;
  channelName: string;
  channelId: string;
  userId: string;
  work: string;
  status: WorkqueueStatus;
  claimantId?: string;
  // Add more properties as needed
}

export enum WorkqueueStatus {
  Backlog = 1,
  InProgress = 2,
  Done = 3,
}
Create a Work Queue Workflow
Before you build the Slack bot, create a Temporal Workflow to persist the state of the Work Queue. This Workflow will be long running and any given instance of it will map directly to a specific Slack channel. This pattern is often called the Entity Workflow pattern.
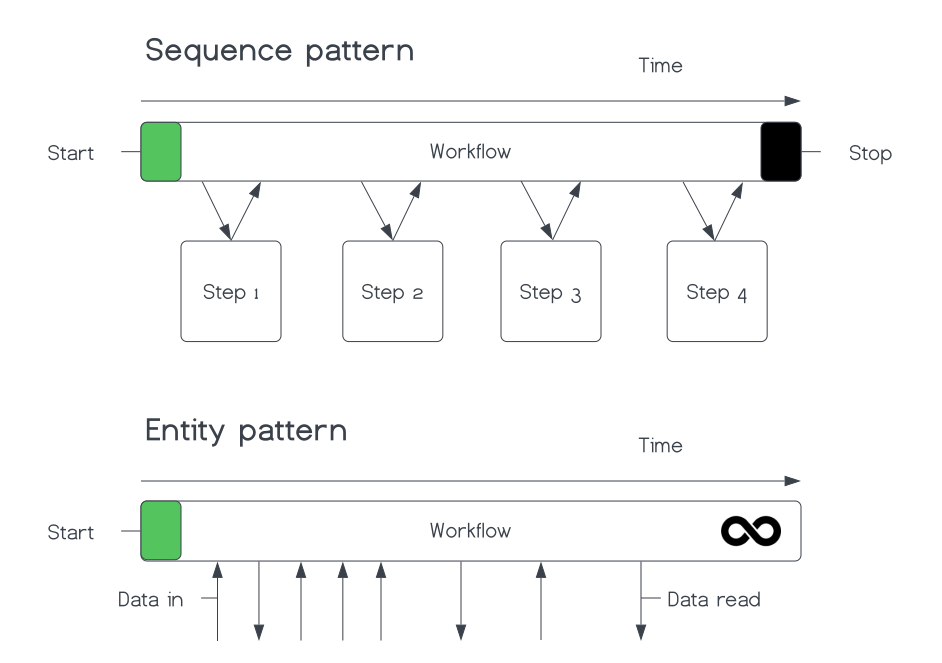
Other very common use cases for an entity pattern Workflow: customers, shopping carts, orders, users.
To craft the Entity Workflow pattern, use the handy condition API. The Workflow awaits on a Continue-As-New suggestion from the Temporal Service.
import {
  condition,
  continueAsNew,
  isCancellation,
  workflowInfo,
  // ...
} from '@temporalio/workflow';
import { WorkqueueData } from '../../../common-types/types';
// ...
export async function workqueue(existingData?: WorkqueueData[]): Promise<void> {
  const wqdata: WorkqueueData[] = existingData ?? [];
  // ...
  try {
    // Await until suggestion to Continue-As-New due to History size
    // If a Cancellation request exists, the condition call will throw the Cancellation error
    await condition(() => workflowInfo().continueAsNewSuggested);
  } catch (e) {
    // Catch a Cancellation error
    if (isCancellation(e)) {
      // Set the Workflow status to Cancelled by throwing the CancelledFailure error
      throw e;
    } else {
      // Handle other types of errors
      throw e;
    }
  }
  await continueAsNew<typeof workqueue>(wqdata);
}
What's also handy about the condition API is that if there is a Cancellation request, the condition call will throw a Cancellation error.
Next, define message handlers - Signals and Queries. Signals send data into a Workflow. Queries read the state of a Workflow.
import {
  // ...
  defineQuery,
  defineSignal,
  setHandler,
} from '@temporalio/workflow';
// ...
export const getWorkqueueDataQuery = defineQuery<WorkqueueData[]>(
  'getWorkqueueData',
);
export const addWorkToQueueSignal = defineSignal<[WorkqueueData]>(
  'addWorkqueueData',
);
export const claimWorkSignal = defineSignal<
  [{ workId: string; claimantId: string }]
>('claimWork');
export const completeWorkSignal = defineSignal<[{ workId: string }]>(
  'completeWork',
);

export async function workqueue(existingData?: WorkqueueData[]): Promise<void> {
  // ...
  // Register a Query handler for 'getWorkqueueData'
  setHandler(getWorkqueueDataQuery, () => {
    return wqdata;
  });

  // Register the Signal handler for adding work
  setHandler(addWorkToQueueSignal, (data: WorkqueueData) => {
    wqdata.push(data);
  });

  // Register Signal handler for claiming work
  setHandler(claimWorkSignal, ({ workId, claimantId }) => {
    const workItem = wqdata.find((item) => item.id === workId);
    if (workItem) {
      workItem.claimantId = claimantId;
      workItem.status = 2;
    }
  });

  // Register Signal handler for completing work
  setHandler(completeWorkSignal, ({ workId }) => {
    const index = wqdata.findIndex((item) => item.id === workId);
    if (index !== -1) {
      wqdata.splice(index, 1);
    }
  });
  // ...
}
Register your Workflow with a Temporal Worker. Create worker.ts inside temporal-application/src:
import 'dotenv/config';
import { NativeConnection, Worker } from '@temporalio/worker';
import path from 'path';

async function run() {
  try {
    const worker = await Worker.create({
      namespace: process.env.TEMPORAL_DEV_NAMESPACE || '',
      workflowsPath: path.resolve(__dirname, './workflows'),
      taskQueue: `${process.env.ENV}-temporal-iq-task-queue`,
    });

    await worker.run();
  } catch (err) {
    console.error(err);
    process.exit(1);
  }
}

run();
Make sure your package.json in the temporal-application project has a script to run the Worker:
{
  // ...
  "scripts": {
    "start": "ts-node src/worker.ts"
  }
  // ...
}
Then run:
npm start
Leave the Worker running while you develop the Slack bot.
If you make any changes to the Workflow code you will need to restart the Worker.
Develop your Slack Bot
Create two modules: one for the Temporal Client, and one that interacts with the Work Queue Workflow. The main slack_bot.ts file initializes the Slack App and the Temporal Client.
First, create and export a Temporal Client in bot/modules/temporal-client.ts:
import 'dotenv/config';
import { Client, Connection } from '@temporalio/client';

export let temporalClient: Client;

export async function initializeTemporalClient() {
  const connection = await Connection.connect();

  temporalClient = new Client({
    connection,
    namespace: process.env.TEMPORAL_DEV_NAMESPACE!,
  });
}
Now, initialize the Slack App in bot/slack_bot.ts:
import 'dotenv/config';
import {
  App,
  // ...
} from '@slack/bolt';
import { initializeTemporalClient } from './modules/dev-temporal-client';
// ...
// Initializes your app with your bot token, app token, and signing secret
const app = new App({
  token: process.env.SLACK_BOT_TOKEN!,
  signingSecret: process.env.SLACK_SIGNING_SECRET!,
  socketMode: true,
  appToken: process.env.SLACK_APP_TOKEN!,
});
// ...
// Register Slack bot error handler
app.error(async ({ error }: { error: Error }) => {
  if (error instanceof Error) {
    console.error(`Error: ${error.name}, Message: ${error.message}`);
  } else {
    console.error('An unknown error occurred', error);
  }
});

// Start the app
(async () => {
  try {
    await app.start();
    await initializeTemporalClient();
    console.log('⚡️ Bolt app is running!');
  } catch (error) {
    console.error('Failed to start Bolt app:', error);
  }
})();
Create the workqueue module that interacts with the Work Queue Workflow at bot/modules/workqueue.ts:
// ...
import {
  RespondFn,
  SayFn,
  SlackCommandMiddlewareArgs,
  // ...
} from '@slack/bolt';
import { WorkqueueData, WorkqueueStatus } from '../../common-types/types';
import { temporalClient } from './dev-temporal-client';
// ...
import { WorkflowExecutionAlreadyStartedError } from '@temporalio/client';
// ...
// Handles and routes all incoming Work Queue Slash Commands
export async function handleWorkqueueCommand(
  command: SlackCommandMiddlewareArgs['command'],
  say: SayFn,
  respond: RespondFn,
) {
  const commandText = command.text?.trim();

  if (commandText === '!delete') {
    await deleteWorkqueue(command, say);
  } else if (commandText === '') {
    await displayWorkQueue(command, respond);
  } else {
    await addWorkToQueue(command, say);
  }
  return;
}
There are three possible ways to use the Slash Command:
workqueue !delete- delete the Work Queue via a Cancellation request to the Workflow.workqueue- display the current Work Queue via a Query.workqueue <work>- add a new work item via a Signal.
Define displayWorkQueue, createNewWorkqueue, and queryWorkqueue in workqueue.ts:
// ...
// Display the Work Queue for the channel
// Creates a new Work Queue if it does not exist
async function displayWorkQueue(
  command: SlackCommandMiddlewareArgs['command'],
  respond: RespondFn,
) {
  // Get the channel name in plain text
  const channelName = command.channel_name;
  // Create a new Work Queue for the channel
  await createNewWorkQueue(channelName);
  // If the Work Queue already exists, Query it
  const data = await queryWorkQueue(channelName, respond);
  await replyEphemeral(
    respond,
    'Work Queue cannot display',
    formatWorkqueueDataForSlack(channelName, data),
  );
}

// Create a new Work Queue for the channel if one does not exist
async function createNewWorkQueue(workflowid: string): Promise<void> {
  try {
    await temporalClient.workflow.start('workqueue', {
      taskQueue: `${process.env.ENV}-temporal-iq-task-queue`,
      workflowId: workflowid,
    });
  } catch (e) {
    if (e instanceof WorkflowExecutionAlreadyStartedError) {
      console.log('Workflow already started');
    } else {
      throw e;
    }
  }
}

// Read the state of the Work Queue for the channel using a Query
async function queryWorkQueue(
  workflowId: string,
  say: SayFn,
): Promise<WorkqueueData[]> {
  try {
    const handle = temporalClient.workflow.getHandle(workflowId);
    const result = await handle.query<WorkqueueData[]>(getWorkqueueDataQuery);
    console.log('Current workqueue data:', result);
    return result;
  } catch (error) {
    console.error('Error querying workqueue data:', error);
    await say('An error occurred while Querying the Work Queue.');
    return [];
  }
}
Add the functionality to add work to the Work Queue:
// ...
// Add work to the queue using a Signal
async function addWorkToQueue(
  command: SlackCommandMiddlewareArgs['command'],
  say: SayFn,
) {
  // Get the channel name in plain text
  const channelId = command.channel_id;
  const channelName = command.channel_name;
  const wqdata = buildWQData(command, channelId, channelName);
  await signalAddWork(wqdata, say);
  // Reply to the message directly in the thread
  await reply(say, `Added Work ${wqdata.id} to the Queue.`);
}
// ...
async function signalAddWork(params: WorkqueueData, say: SayFn): Promise<void> {
  try {
    await temporalClient.workflow.signalWithStart('workqueue', {
      workflowId: params.channelName,
      taskQueue: `${process.env.ENV}-temporal-iq-task-queue`,
      signal: addWorkToQueueSignal,
      signalArgs: [params],
    });
  } catch (error) {
    console.error('Error signaling workqueue data:', error);
    await say('An error occurred while Signaling the Work Queue.');
  }
}
The key here is the Temporal Client's signalWithStart API. This starts the Workflow if it doesn't exist and then sends the Signal with Work Item data.
Next, implement work-item claim. In slack_bot.ts, add a listener for the wq_claim button:
// ...
// Listen for Work Item Claim
app.action<BlockAction<BlockElementAction>>(
  'wq_claim',
  async ({ ack, say, body }) => {
    await ack();
    // Ensure the body.actions[0] is a ButtonAction
    const action = body.actions[0] as ButtonAction;
    if (action.value) {
      const [channelName, workId, userId] = action.value.split('_');
      const claimantId = body.user.id;
      // Send signal to the Temporal workflow to claim the work
      await signalClaimWork(channelName, workId, claimantId, userId, say);
    } else {
      console.error('Action value is undefined.');
    }
  },
);
Then in workqueue.ts, define a claimWork function:
// ...
export async function signalClaimWork(
  channelName: string,
  workId: string,
  claimantId: string,
  userId: string,
  say: SayFn,
) {
  try {
    const handle = temporalClient.workflow.getHandle(channelName);
    await handle.signal(claimWorkSignal, { workId, claimantId });
    console.log(`Work item ${workId} claimed by ${claimantId}`);
    await reply(
      say,
      `<@${userId}> Work item ${workId} claimed by <@${claimantId}>.`,
    );
  } catch (error) {
    console.error('Failed to signal claim work:', error);
  }
}
Add a listener for the wq_complete button:
// ...
// Listen for Work Item Completion
app.action<BlockAction<BlockElementAction>>(
  'wq_complete',
  async ({ ack, say, body }) => {
    await ack();
    const action = body.actions[0] as ButtonAction;
    if (action.value) {
      const [channelName, workId, userId] = action.value.split('_');
      const message = body.message as GenericMessageEvent;
      // Send signal to the Temporal workflow to complete the work
      await signalCompleteWork(channelName, workId, message, userId, say);
    } else {
      console.error('Action value is undefined.');
    }
  },
);
Define a completeWork function in workqueue.ts:
// ...
export async function signalCompleteWork(
  channelId: string,
  workId: string,
  message: GenericMessageEvent,
  userId: string,
  say: SayFn,
) {
  try {
    const handle = temporalClient.workflow.getHandle(channelId);
    await handle.signal(completeWorkSignal, { workId });
    console.log(`Work item ${workId} marked as complete`);
    await reply(say, `<@${userId}> Work item ${workId} marked as complete.`);
  } catch (error) {
    console.error('Failed to signal complete work:', error);
  }
}
Finally, add the ability to delete a Work Queue for the channel. Send a Cancellation Request using the Workflow ID:
// ...
// Delete the Work Queue for the channel with a Cancellation Request
export async function deleteWorkqueue(
  command: SlackCommandMiddlewareArgs['command'],
  say: SayFn,
): Promise<void> {
  const workflowId = command.channel_name;
  try {
    const handle = temporalClient.workflow.getHandle(workflowId);
    await handle.cancel();
    console.log(`Workflow with ID ${workflowId} has been cancelled.`);
    await reply(say, `Work Queue has been deleted for this channel.`);
  } catch (error) {
    console.error(`Failed to cancel workflow with ID ${workflowId}:`, error);
    await reply(say, `Failed to delete Work Queue for this channel.`);
  }
}
By using the Slack channel name as the Workflow ID, you can tell which Workflow corresponds to which channel in the Temporal UI when debugging.

Run your Slack bot. Make sure your package.json in the bot project has a script:
{
  // ...
  "scripts": {
    "start": "ts-node src/slack_bot.ts"
  }
  // ...
}
Then run:
npm start
Once running, the bot listens for the workqueue Slash Command, wq_claim, and wq_complete button click events in your Slack workspace.
Test the Workflow with Jest framework (Optional)
Test the Work Queue Workflow using Jest. Create workqueue.test.ts in the temporal-application/src/__tests__ directory. Ensure you have the following devDependencies:
{
  // ...
  "devDependencies": {
    "@temporalio/client": "^1.10.1",
    "@temporalio/nyc-test-coverage": "^1.10.1",
    "@temporalio/testing": "^1.10.1",
    "@types/jest": "^29.5.12",
    "@types/node": "^20.14.2",
    "jest": "^29.7.0",
    "ts-jest": "^29.1.4",
    "ts-node": "^10.9.2",
    "typescript": "^5.4.5"
    // Any other packages needed for testing logic
  }
  // ...
}
Set up the Test Suite:
import { WorkflowCoverage } from '@temporalio/nyc-test-coverage';
import { TestWorkflowEnvironment } from '@temporalio/testing';
import { DefaultLogger, Runtime, Worker } from '@temporalio/worker';
// ...
describe('Work Queue Workflow', () => {
  let testEnv: TestWorkflowEnvironment;
  const workflowCoverage = new WorkflowCoverage();

  beforeAll(async () => {
    Runtime.install({ logger: new DefaultLogger('WARN') });
    testEnv = await TestWorkflowEnvironment.createLocal();
  });

  afterAll(async () => {
    await testEnv?.teardown();
  });

  afterAll(() => {
    workflowCoverage.mergeIntoGlobalCoverage();
  });
  // ...
});
You can test for many scenarios:
- Adding work to the queue
- Claiming work in the queue
- Completing work in the queue
- Continuing-As-New when event count is high
The basic pattern to test adding work looks like this:
// ...
test('should add work to the queue', async () => {
  // Get a test environment Temporal Client
  const { client, nativeConnection } = testEnv;
  // Create a test environment Worker
  const worker = await Worker.create(
    workflowCoverage.augmentWorkerOptions({
      connection: nativeConnection,
      taskQueue: 'test',
      workflowsPath: require.resolve('../workflows'),
    }),
  );
  // ...
  // Run the Worker
  await worker.runUntil(async () => {
    const handle = await client.workflow.start(workqueue, {
      args: [],
      workflowId: workflowId,
      taskQueue: 'test',
    });
    const workItem: WorkqueueData = {
      // ...
    };
    // Add work to the queue
    await handle.signal(addWorkToQueueSignal, workItem);
    // Check to see if the data is there
    const result = await handle.query(getWorkqueueDataQuery);
    // Compare the data
    expect(result).toContainEqual(workItem);
  });
});
Conclusion
You built a Slack App that uses Temporal to manage a Work Queue. You created a Work Queue Workflow, sent messages to the Workflow, and tested the Temporal Application.
This Slack App is a great example of how you can use Temporal as a backend for your application without having to manage a database. The backend is scalable and you can observe it and debug it using the Temporal UI.
Get notified when we launch new educational content
New courses, tutorials, and learning resources - straight to your inbox.