Set up a Temporal Application project
- Introduction
- Project setup
- Durable execution
This chapter covers how to use a terminal, a code editor, and a development Cluster to create a Namespace, write a single-Activity Workflow, run a Worker that talks to your development Cluster, run a Workflow using the Temporal CLI, add a testing framework, and view Workflows in the Web UI.
This chapter covers the minimum set of concepts and implementation details needed to build and run a Temporal Application using Java. By the end of this chapter you will know how to construct a new Temporal Application project.
There are three ways to follow this guide:
Install the Temporal CLI
The Temporal CLI is available on macOS, Windows, and Linux. See the documentation for detailed install information.
Install via download
- Download the version for your OS and architecture:
- Linux amd64
- Linux arm64
- macOS amd64
- macOS arm64 (Apple silicon)
- Windows amd64
- Extract the downloaded archive.
- Add the
temporalbinary to yourPATH(temporal.exefor Windows).
Install via Homebrew
brew install temporal
Build the Temporal CLI
- Install Go
- Clone the repository
- Switch to the cloned directory and run
go build ./cmd/temporal
The executable will be at temporal (temporal.exe for Windows). See the documentation for detailed usage information.
Choose a development Cluster
Choose a development environment based on your requirements. The Temporal Server source is MIT-licensed and can be run in many ways, but for most developers the choices below are the best starting points:
- Local development server
- Temporal Cloud
- Self-hosted Temporal Cluster
In every scenario, the "Temporal Platform" does not host and run your Workers (application code). It is up to you, the developer, to host your application code. The Temporal Platform ensures that properly written code durably executes in the face of platform-level failures.
Local dev server
Use the local development server if you are new to Temporal, want to start from scratch, and don't have a self-hosted environment or a Temporal Cloud account. The Temporal CLI comes bundled with a development server and provides a fast way to start running Temporal Applications. Note that the local development server does not emit metrics, so for performance tuning use a self-hosted Cluster or Temporal Cloud.
Open a new terminal and run the following command to start the dev server:
temporal server start-dev
This automatically starts the Temporal Web UI at http://localhost:8233, creates a default Namespace, and creates an in-memory database. For more details, see the CLI reference.
The development server creates a default Namespace named "default", but it's a good idea to practice creating a custom one. Use temporal operator namespace create:
temporal operator namespace create backgroundcheck_namespace
Temporal Cloud
If you do not have a Temporal Cloud account, you can request one using the link on the Get Started with Temporal Cloud guide. Start with Temporal Cloud if you already have a production use case or need to move a scalable proof of concept into production.
To create a Namespace in Temporal Cloud, follow the instructions in How to create a Namespace.
Store certificates and private keys generated for your Namespace as files or environment variables in your project. You need access to your certificate and key to run your Workers and start Workflows. For more, see How to manage certificates in Temporal Cloud.
Self-hosted Temporal Cluster
Use a self-hosted environment if you need production-level features but don't yet need or want to pay for Temporal Cloud. Running a self-hosted Cluster lets you try different databases, view Cluster metrics, use custom Search Attributes, and use the Archival feature.
To follow along with self-hosted parts of this guide, install:
Clone the temporalio/docker-compose repository, change into its root, and run docker compose up:
git clone https://github.com/temporalio/docker-compose.git
cd  docker-compose
docker compose up
Create a command alias for the Temporal CLI:
alias temporal_docker="docker exec temporal-admin-tools temporal"
Create a Namespace:
temporal_docker operator namespace create backgroundcheck_namespace
Boilerplate Temporal Application project code
Start with a single-Activity Workflow and register those functions with a Worker. After the Worker is running and you've started a Workflow Execution, add a testing framework.
Project structure
You can organize Temporal Application code to suit various needs in a way that aligns with your language's idiomatic style. The best practice is to group Workflows together, Activities together, and separate your Worker process into a standalone file.
For monorepo-style organization, consider a designated Workflow directory per use case and a dedicated place for shared Activities:
/monorepo
    /src
        /main
            /java
                /sharedactivities
                    | PaymentActivities.java
                    | PaymentActivitiesImpl.java
                    | SendEmailActivities.java
                    | SendEmailActivitiesImpl.java
                /backgroundcheck
                    /workflows
                        | BackgroundCheckWorkflow.java
                        | BackgroundCheckWorkflowImpl.java
                    /activities
                        | SsnTraceActivities.java
                        | SsnTraceActivitiesImpl.java
                    /worker
                        | BackgroundCheckWorker.java
                /loanapplication
                    /workflows
                        | LoanApplicationWorkflow.java
                        | LoanApplicationWorkflowImpl.java
                    /activities
                        | CreditCheckActivities.java
                        | CreditCheckActivitiesImpl.java
                    /worker
                        | LoanApplicationWorker.java
            /resources
                | logback.xml
        /test
            /java
                /sharedactivities
                    | PaymentActivitiesTest.java
                    | SendEmailActivitiesTest.java
                /backgroundcheck
                    /workflows
                        | BackgroundCheckWorkflowTest.java
                        | BackgroundCheckWorkflowIntegrationTest.java
                    /activities
                        | SsnTraceActivitiesTest.java
                /loanapplication
                    /workflows
                        | LoanApplicationWorkflowTest.java
                        | LoanApplicationWorkflowIntegrationTest.java
                    /activities
                        | CreditCheckActivitiesTest.java
If you are following along with this guide, your project will look like this:
backgroundcheck
└── src
    ├── main
    │   └── java
    │       └── backgroundcheckboilerplate
    │           ├── BackgroundCheckBoilerplateActivities.java
    │           ├── BackgroundCheckBoilerplateActivitiesImpl.java
    │           ├── BackgroundCheckBoilerplateWorkflow.java
    │           ├── BackgroundCheckBoilerplateWorkflowImpl.java
    │           └── workers
    │               ├── CloudWorker.java
    │               ├── DevServerWorker.java
    │               └── SelfHostedWorker.java
    └── test
        └── java
            └── backgroundcheckboilerplate
                ├── BackgroundCheckBoilerplateActivitiesTest.java
                ├── BackgroundCheckBoilerplateWorkflowIntegrationTest.java
                └── BackgroundCheckBoilerplateWorkflowTest.java
Initialize a Java project with Maven
If you are using Maven, ensure your pom.xml sets compiler.source and compiler.target to at least 1.8:
<properties>
  <project.build.sourceEncoding>UTF-8</project.build.sourceEncoding>
  <maven.compiler.source>1.8</maven.compiler.source>
  <maven.compiler.target>1.8</maven.compiler.target>
</properties>
Include the Temporal SDK and testing packages in the dependencies section:
<dependency>
    <groupId>io.temporal</groupId>
    <artifactId>temporal-sdk</artifactId>
    <version>1.31.0</version>
</dependency>
Then run mvn clean compile to perform the first compilation and pull in the dependencies.
Initialize a Java project with Gradle
If you are using Gradle, add the Temporal SDK to the dependencies section of your build.gradle file:
dependencies {
    implementation group: 'io.temporal', name: 'temporal-sdk', version: '1.31.0'
}
Then run ./gradlew build to perform a test build and download the dependencies.
Boilerplate Workflow code
A Workflow Definition in the Temporal Java SDK is an interface and its implementation.
package backgroundcheckboilerplate;

import io.temporal.workflow.WorkflowInterface;
import io.temporal.workflow.WorkflowMethod;

// Workflow Interfaces must be annotated with @WorkflowInterface
@WorkflowInterface
public interface BackgroundCheckBoilerplateWorkflow {

  // The Workflow Method within the interface must be annotated with @WorkflowMethod
  @WorkflowMethod
  public String backgroundCheck(String socialSecurityNumber);

}
Annotate the interface declaration with @WorkflowInterface and the Workflow Method with @WorkflowMethod. There can only be one Workflow Method per Workflow Definition.
Now define the implementation:
package backgroundcheckboilerplate;

import io.temporal.activity.ActivityOptions;
import io.temporal.workflow.Workflow;

import java.time.Duration;

public class BackgroundCheckBoilerplateWorkflowImpl implements BackgroundCheckBoilerplateWorkflow {

  // Define the Activity Execution options
  // StartToCloseTimeout or ScheduleToCloseTimeout must be set
  ActivityOptions options = ActivityOptions.newBuilder()
          .setStartToCloseTimeout(Duration.ofSeconds(5))
          .build();

  // Create an client stub to activities that implement the given interface
  private final BackgroundCheckBoilerplateActivities activities =
      Workflow.newActivityStub(BackgroundCheckBoilerplateActivities.class, options);

  @Override
  public String backgroundCheck(String socialSecurityNumber) {
    String ssnTraceResult = activities.ssnTraceActivity(socialSecurityNumber);
    return ssnTraceResult;
  }

}
To have a Workflow call Activities, instantiate an object representing those Activities. Temporal requires that you set either StartToCloseTimeout or ScheduleToCloseTimeout when creating your Activities stub. See the documentation for more on these options.
Workflow Methods support parameters like regular Java methods, but all Workflow Definition parameters must be serializable (using the Jackson JSON Payload Converter). To request the execution of an Activity Execution, call the Activity Method from within the Workflow Method using the activities object.
Boilerplate Activity code
An Activity is also defined as an interface and its implementation.
package backgroundcheckboilerplate;

import io.temporal.activity.ActivityInterface;

// Activity Interfaces must be annotated with @ActivityInterface
@ActivityInterface
// BackgroundCheckActivities is the interface that contains your Activity Definitions
public interface BackgroundCheckBoilerplateActivities {

  // ssnTraceActivity is your custom Activity Definition
  public String ssnTraceActivity(String socialSecurityNumber);

}
Annotate the interface with @ActivityInterface. Designate methods within the interface as Activity Methods by annotating them with @ActivityMethod. There can be multiple Activity Methods per Activity Definition.
package backgroundcheckboilerplate;

public class BackgroundCheckBoilerplateActivitiesImpl implements BackgroundCheckBoilerplateActivities{

  @Override
  public String ssnTraceActivity(String socialSecurityNumber){

    // This is where a call to another service would be made to perform the trace
    // We are simulating that the service that does SSNTrace executed successfully
    // with a passing value being returned

    String result = "pass";
    return result;
  }

}
Run your Workflow and Activities using a Worker
The Worker establishes a persistent connection to the Temporal Cluster and begins polling a Task Queue, seeking work to perform. To run a Worker with a local development server, generate gRPC stubs, initialize a Temporal Client, build a WorkerFactory, register the Workflow and Activities, and start the Worker.
package backgroundcheckboilerplate.workers;

import backgroundcheckboilerplate.BackgroundCheckBoilerplateActivitiesImpl;
import backgroundcheckboilerplate.BackgroundCheckBoilerplateWorkflowImpl;
import io.temporal.client.WorkflowClient;
import io.temporal.serviceclient.WorkflowServiceStubs;
import io.temporal.worker.Worker;
import io.temporal.worker.WorkerFactory;
public class DevServerWorker {
  public static void main(String[] args) {

    // Generate the gRPC stubs
    WorkflowServiceStubs service = WorkflowServiceStubs.newLocalServiceStubs();

    // Initialize the Temporal Client, passing in the gRPC stubs
    WorkflowClient client = WorkflowClient.newInstance(service);

    // Initialize a WorkerFactory, passing in the Temporal Client (WorkflowClient)
    WorkerFactory factory = WorkerFactory.newInstance(client);

    // Create a new Worker
    Worker worker = factory.newWorker("backgroundcheck-tasks");

    // Register the Workflow by passing in the class to the worker
    worker.registerWorkflowImplementationTypes(BackgroundCheckBoilerplateWorkflowImpl.class);

    // Register the Activities by passing in an Activities object used for execution
    worker.registerActivitiesImplementations(new BackgroundCheckBoilerplateActivitiesImpl());

    // Start the Worker
    factory.start();
  }
}
Run a Temporal Cloud Worker
A Temporal Cloud Worker requires the Cloud Namespace, address, and the certificate and private key associated with the Namespace:
package backgroundcheckboilerplate.workers;

import java.io.FileInputStream;
import java.io.InputStream;
import io.grpc.netty.shaded.io.netty.handler.ssl.SslContext;
import io.temporal.client.WorkflowClient;
import io.temporal.client.WorkflowClientOptions;
import io.temporal.serviceclient.SimpleSslContextBuilder;
import io.temporal.serviceclient.WorkflowServiceStubs;
import io.temporal.serviceclient.WorkflowServiceStubsOptions;
import io.temporal.worker.Worker;
import io.temporal.worker.WorkerFactory;
import java.lang.System;
import backgroundcheckboilerplate.BackgroundCheckBoilerplateActivitiesImpl;
import backgroundcheckboilerplate.BackgroundCheckBoilerplateWorkflowImpl;
import java.io.IOException;

public class CloudWorker {
  public static void main(String[] args) throws IOException{

    // Get the key and certificate from your environment or local machine
    String clientCertFile = "./certificate.pem";
    String clientCertPrivateKey = "./private.key";

    // Open the key and certificate as Input Streams
    InputStream clientCertInputStream = new FileInputStream(clientCertFile);
    InputStream clientKeyInputStream = new FileInputStream(clientCertPrivateKey);

    // Generate the sslContext using the Client Cert and Key
    SslContext sslContext = SimpleSslContextBuilder.forPKCS8(clientCertInputStream, clientKeyInputStream).build();

    // Specify the host and port of your Temporal Cloud Namespace
    // Host and port format: namespace.unique_id.tmprl.cloud:port
    String namespace = System.getenv("TEMPORAL_CLOUD_NAMESPACE");
    String port = System.getenv("TEMPORAL_CLOUD_PORT");
    String hostPort = namespace + ".tmprl.cloud:" + port;

    // Specify the IP address, port, and SSL Context for the Service Stubs options
    WorkflowServiceStubsOptions stubsOptions = WorkflowServiceStubsOptions.newBuilder()
            .setSslContext(sslContext)
            .setTarget(hostPort)
            .build();

    // Generate the gRPC stubs using the options provided
    WorkflowServiceStubs service = WorkflowServiceStubs.newServiceStubs(stubsOptions);

    // Specify the namespace in the Client options
    WorkflowClientOptions options = WorkflowClientOptions.newBuilder()
            .setNamespace(namespace)
            .build();

    // Initialize the Temporal Client, passing in the gRPC stubs and Client options
    WorkflowClient client = WorkflowClient.newInstance(service, options);

    // Initialize a WorkerFactory, passing in the Temporal Client (WorkflowClient)
    WorkerFactory factory = WorkerFactory.newInstance(client);

    // Create a new Worker
    Worker worker = factory.newWorker("backgroundcheck-tasks");

    // Register the Workflow by passing in the class to the worker
    worker.registerWorkflowImplementationTypes(BackgroundCheckBoilerplateWorkflowImpl.class);

    // Register the Activities by passing in an Activities object used for execution
    worker.registerActivitiesImplementations(new BackgroundCheckBoilerplateActivitiesImpl());

    // Start the Worker
    factory.start();
  }
}
Copy the Namespace Id and the gRPC endpoint from the Namespace detail page on Temporal Cloud Namespaces.
Run a Self-hosted Worker
To deploy a self-hosted Worker to your Docker environment, configure your Worker with the appropriate IP address and port. The default docker-compose.yml file in the temporalio/docker-compose repo has the Temporal Server exposed on port 7233 on the temporal-network:
services:
  # ...
  temporal:
    container_name: temporal
    # ...
    networks:
      - temporal-network
    ports:
      - 7233:7233
    # ...
  # ...
You can see the available networks with:
docker network ls
Inspect the network to find the Temporal container's IP address:
docker network inspect temporal-network
[
  {
    "Name": "temporal-network",
    // ...
    "Containers": {
      // ...
      "53cf62f0cc6cfd2a9627a2b5a4c9f48ffe5a858f0ef7b2eaa51bf7ea8fd0e86f": {
        "Name": "temporal",
        // ...
        "IPv4Address": "172.18.0.4/16"
        // ...
      }
      // ...
    }
    // ...
  }
]
Set the IP address and port in the Service Stubs options and the Namespace in the Temporal Client options:
package backgroundcheckboilerplate.workers;

import backgroundcheckboilerplate.BackgroundCheckBoilerplateActivitiesImpl;
import backgroundcheckboilerplate.BackgroundCheckBoilerplateWorkflowImpl;
import io.temporal.client.WorkflowClient;
import io.temporal.client.WorkflowClientOptions;
import io.temporal.serviceclient.WorkflowServiceStubs;
import io.temporal.serviceclient.WorkflowServiceStubsOptions;
import io.temporal.worker.Worker;
import io.temporal.worker.WorkerFactory;

public class SelfHostedWorker {
  public static void main(String[] args) {

    // Specify the IP address and port for the Service Stubs options
    WorkflowServiceStubsOptions stubsOptions = WorkflowServiceStubsOptions.newBuilder()
            .setTarget("mycluster.example.com:7233")
            .build();

    // Generate the gRPC stubs using the options provided
    WorkflowServiceStubs service = WorkflowServiceStubs.newServiceStubs(stubsOptions);

    // Specify the namespace in the Client options
    WorkflowClientOptions options = WorkflowClientOptions.newBuilder()
            .setNamespace("backgroundcheck_namespace")
            .build();

    // Initialize the Temporal Client, passing in the gRPC stubs and Client options
    WorkflowClient client = WorkflowClient.newInstance(service, options);

    // Initialize a WorkerFactory, passing in the Temporal Client (WorkflowClient)
    WorkerFactory factory = WorkerFactory.newInstance(client);

    // Create a new Worker
    Worker worker = factory.newWorker("backgroundcheck-tasks");

    // Register the Workflow by passing in the class to the worker
    worker.registerWorkflowImplementationTypes(BackgroundCheckBoilerplateWorkflowImpl.class);

    // Register the Activities by passing in an Activities object used for execution
    worker.registerActivitiesImplementations(new BackgroundCheckBoilerplateActivitiesImpl());

    // Start the Worker
    factory.start();
  }
}
Add a Docker file named dockerfile with the following contents to the root of your project:
# Use an official image of OpenJDK as the base image
FROM openjdk:11-jre-slim

# Set the working directory in the container
WORKDIR /app

# Copy the Maven project files to the container
COPY src src/
COPY pom.xml .

# Build the Maven project to a JAR file
RUN apt-get update && \
    apt-get install -y maven && \
    mvn clean compile

# Set the entry point for the application
CMD ["mvn", "exec:java", "-Dexec.mainClass='backgroundcheck.workers.SelfHostedWorker']
Make sure the Java version matches the one you used when developing your application and is version 1.8 or greater.
Build the Docker image:
docker build . -t backgroundcheck-worker-image:latest
Run the Worker on the same network as the Temporal Cluster:
docker run --network temporal-network backgroundcheck-worker-image:latest
Start a Workflow with the Temporal CLI
You can use the Temporal CLI to start a Workflow whether you are using a local development server, Temporal Cloud, or a self-hosted environment. The command takes additional options for Temporal Cloud and self-hosted environments.
Local dev server
Use temporal workflow start to start your Workflow:
temporal workflow start \
 --task-queue backgroundcheck-boilerplate-task-queue \
 --type BackgroundCheckBoilerplateWorkflow \
 --input '"555-55-5555"' \
 --namespace backgroundcheck_namespace
For more details, see the temporal workflow start command reference.
List all Workflows in the Namespace:
temporal workflow list \
 --namespace backgroundcheck_namespace
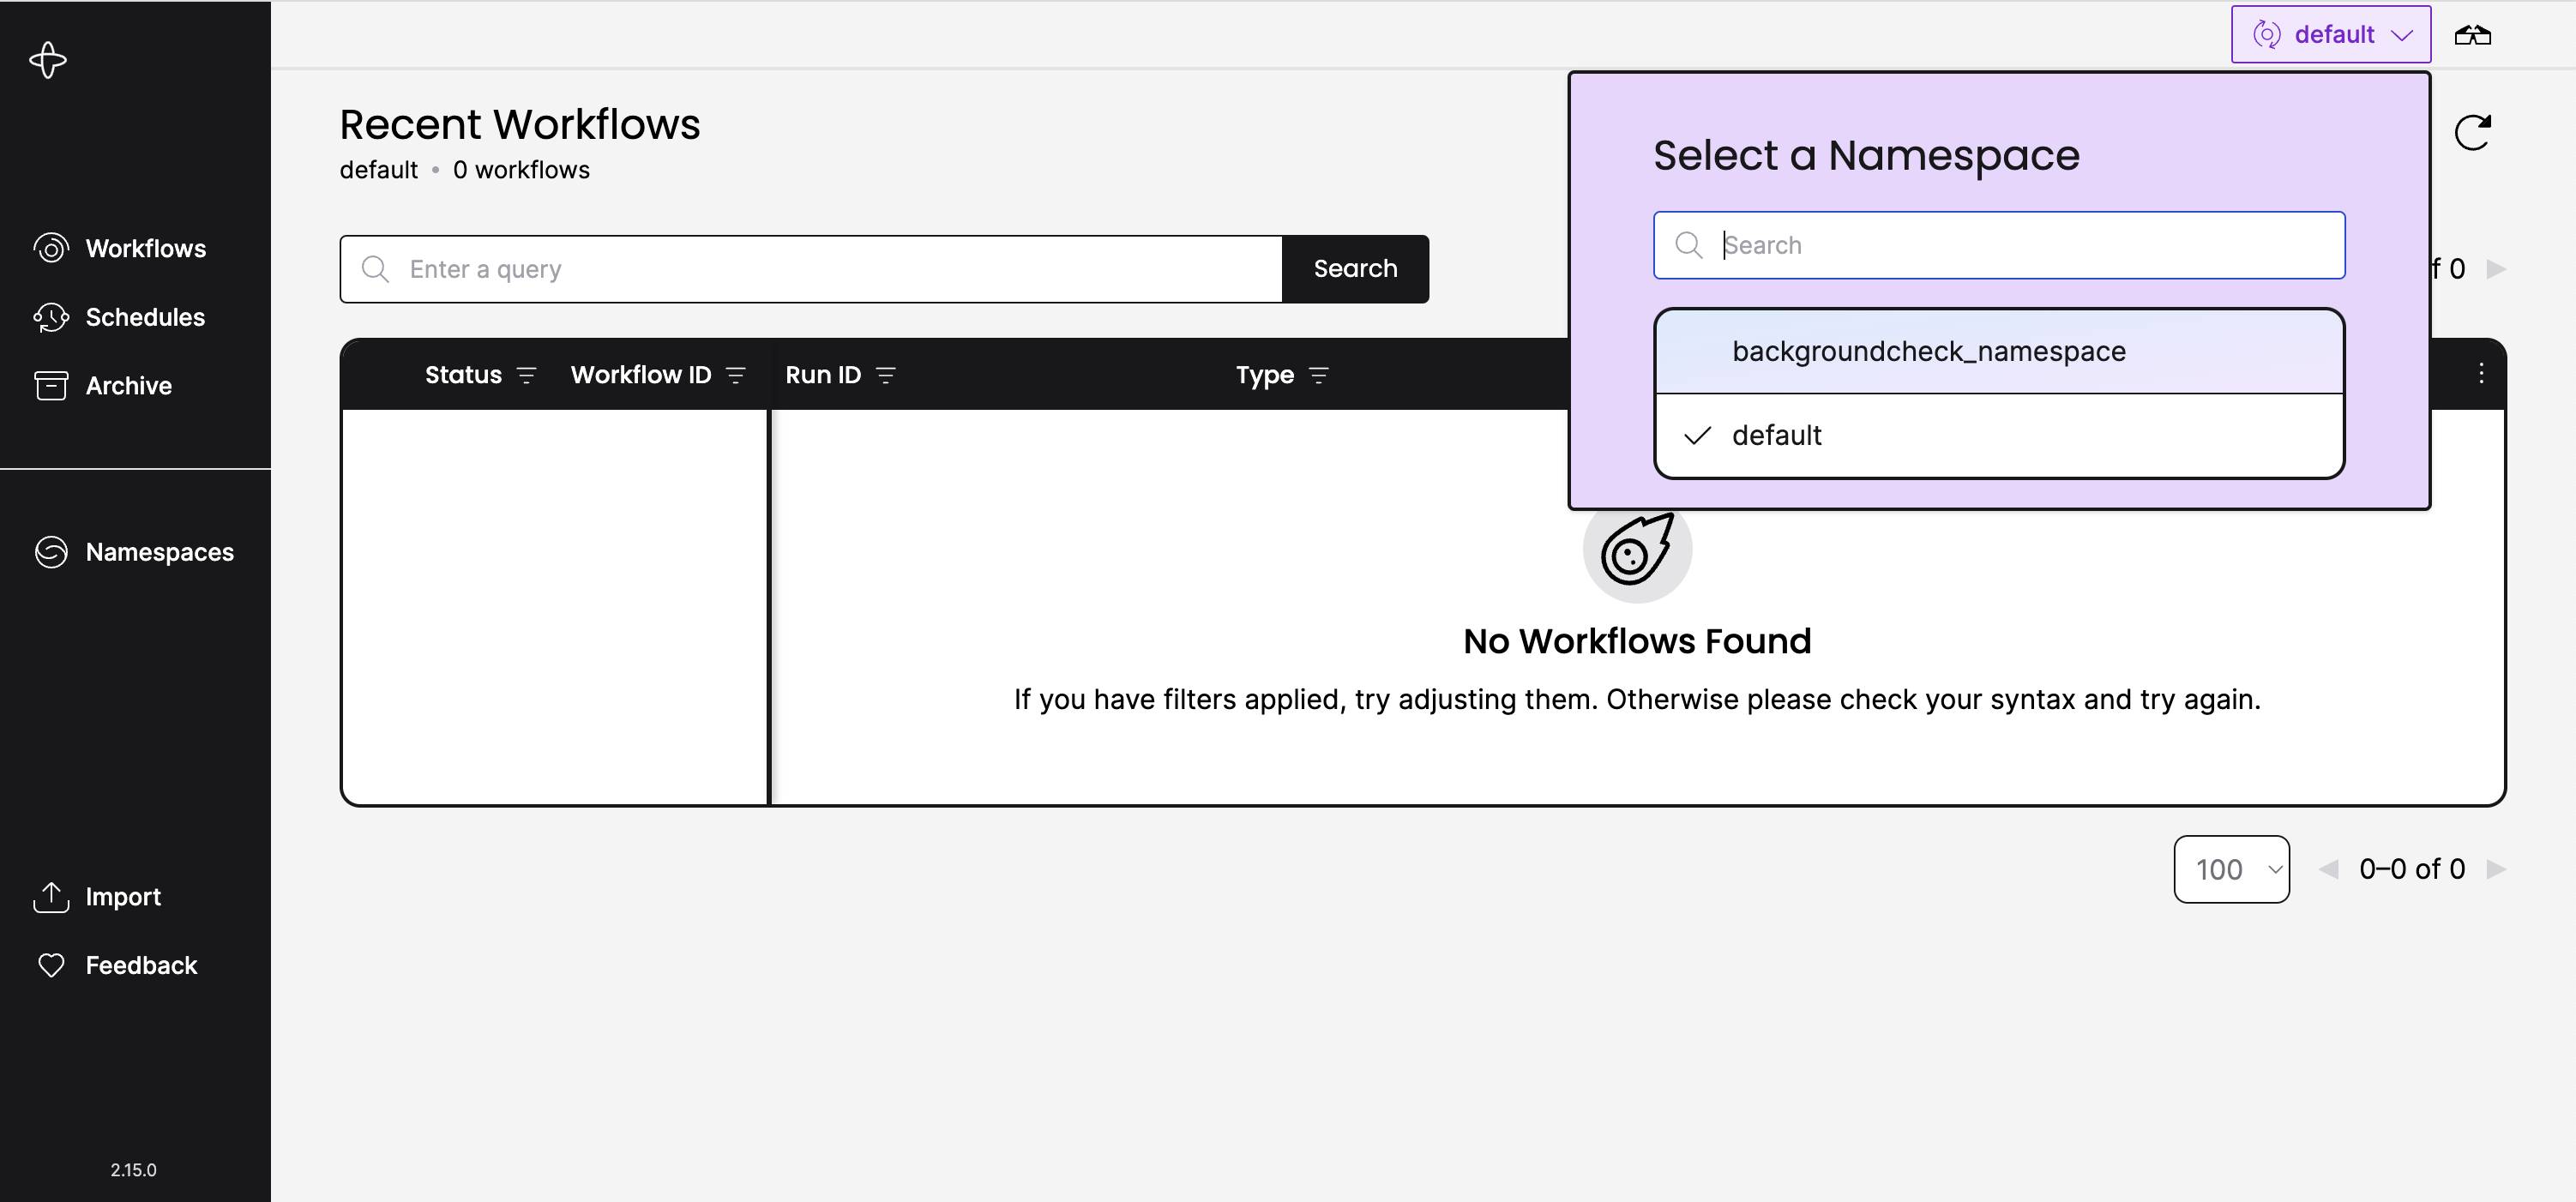
The local development server starts the Web UI at http://localhost:8233. Use the Namespace dropdown to select the project Namespace you created earlier.
Temporal Cloud
Make sure to specify the certificate and private key arguments:
temporal workflow start \
 --task-queue backgroundcheck-boilerplate-task-queue-cloud \
 --type BackgroundCheckBoilerplateWorkflow \
 --tls-cert-path ca.pem \
 --tls-key-path ca.key \
 --input '"555-55-5555"' \
 --namespace <namespace>.<account-id> \
 --address <namespace>.<account-id>.tmprl.cloud:<port>
Make sure the certificate path, private key path, Namespace, and address match your project.
Use environment variables to quickly switch between a local dev server and Temporal Cloud. You can customize the environment names:
# set Cloud env variables
temporal env set cloud.namespace <namespace>.<account-id>
temporal env set cloud.address <namespace>.<account-id>.tmprl.cloud:<port>
temporal env set cloud.tls-cert-path ca.pem
temporal env set cloud.tls-key-path ca.key
# set local env variables
temporal env set local.namespace <namespace>
Then provide a single --env option:
temporal workflow start \
 # ...
 --env cloud \
 # ...
List Workflows in Temporal Cloud:
temporal workflow list \
 --tls-cert-path ca.pem \
 --tls-key-path ca.key \
 --namespace <namespace>.<account-id> \
 --address <namespace>.<account-id>.tmprl.cloud:<port>
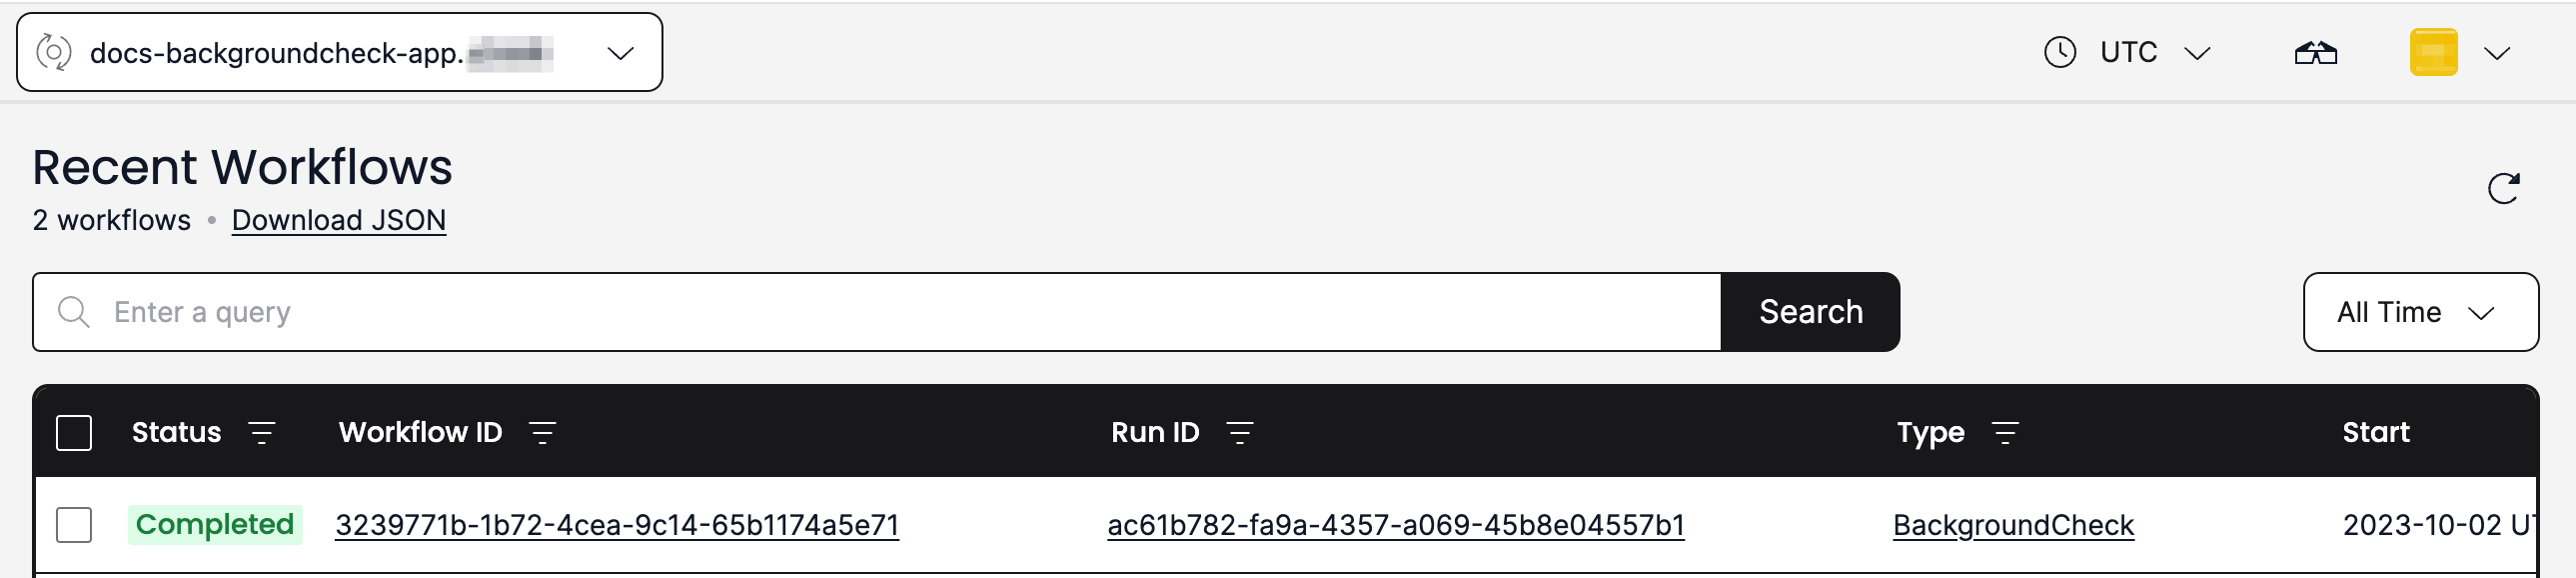
Visit the Workflows page of your Cloud Namespace at https://cloud.temporal.io/namespaces/<namespace>.<account-id>/workflows:
Self-hosted
Use your Temporal CLI alias to start the Workflow:
temporal_docker workflow start \
 --task-queue backgroundcheck-boilerplate-task-queue-self-hosted \
 --type BackgroundCheckBoilerplateWorkflow \
 --input '"555-55-5555"' \
 --namespace backgroundcheck_namespace
List Workflow Executions within the Namespace:
temporal_docker workflow list \
 --namespace backgroundcheck_namespace
Use the Namespace dropdown in the Web UI to select the project Namespace you created earlier.
Add a testing framework
The Temporal Java SDK provides a test framework to facilitate Workflow unit and integration testing. The framework provides the TestWorkflowEnvironment and TestActivityEnvironment classes, which include an in-memory implementation of the Temporal service with automatic time skipping. This lets you easily test long-running Workflows in seconds.
You can use the testing environments with any Java unit testing framework. This guide uses JUnit 5.
Set up testing dependencies
Add io.temporal:temporal-testing as a dependency to your project.
Apache Maven:
<dependency>
    <groupId>io.temporal</groupId>
    <artifactId>temporal-testing</artifactId>
    <version>1.31.0</version>
    <scope>test</scope>
</dependency>
<dependency>
    <groupId>org.junit.jupiter</groupId>
    <artifactId>junit-jupiter</artifactId>
    <version>5.14.1</version>
    <scope>test</scope>
</dependency>
<dependency>
    <groupId>org.mockito</groupId>
    <artifactId>mockito-junit-jupiter</artifactId>
    <version>5.20.0</version>
    <scope>test</scope>
</dependency>
<dependency>
    <groupId>org.mockito</groupId>
    <artifactId>mockito-core</artifactId>
    <version>5.20.0</version>
    <scope>test</scope>
</dependency>
Gradle Groovy DSL:
testImplementation group: 'io.temporal', name: 'temporal-testing', version: '1.31.0'
testImplementation group: 'junit', name: 'junit-jupiter', version: '5.14.1'
testImplementation group: 'org.mockito', name: 'mockito-core', version: '5.20.0'
testImplementation group: 'org.mockito', name: 'mockito-junit-jupiter', version: '5.20.0'
Set the version that matches your dependency version of the Temporal Java SDK.
Testing Activities
Temporal provides TestActivityEnvironment and TestActivityExtension classes to test Activities outside the scope of a Workflow. Testing Activities is similar to testing non-Temporal Java code. Some examples of what to test:
- Exceptions thrown when invoking the Activity Execution
- Exceptions thrown when checking for the result of the Activity Execution
- Activity return values
The following example asserts that the expected value was returned by invoking the Activity:
import static org.junit.jupiter.api.Assertions.assertEquals;
import org.junit.jupiter.api.Test;
import org.junit.jupiter.api.extension.RegisterExtension;
import io.temporal.testing.TestActivityExtension;


public class BackgroundCheckBoilerplateActivitiesTest {

  // Use JUnit Extensions to simplify the creation of the test environment.
  // This creates an environment and registers Activities to a Worker for testing.
  // If you would rather set this up yourself, look into TestActivityEnvironment
  @RegisterExtension
  public static final TestActivityExtension activityExtension = TestActivityExtension.newBuilder()
      .setActivityImplementations(new BackgroundCheckBoilerplateActivitiesImpl()).build();

  // Test the Activity in isolation from the Workflow
  @Test
  public void testSsnTraceActivity(BackgroundCheckBoilerplateActivities activities) {
    String socialSecurityNumber = "111-22-3333";

    // Run the Activity in the test environment
    String result = activities.ssnTraceActivity(socialSecurityNumber);

    // Check for the expected return value
    assertEquals("pass", result);
  }

}
Testing Workflows
Temporal provides TestWorkflowEnvironment and TestWorkflowExtension classes for Workflow testing. You can either test the Workflow code without invoking real Activities by mocking the Workflow's Activities, or test the Workflow and its Activities together. This section covers the first scenario.
import static org.junit.jupiter.api.Assertions.assertEquals;
import static org.mockito.Mockito.mock;
import static org.mockito.Mockito.when;
import static org.mockito.Mockito.withSettings;
import org.junit.jupiter.api.Test;
import org.junit.jupiter.api.extension.RegisterExtension;
import io.temporal.testing.TestWorkflowEnvironment;
import io.temporal.testing.TestWorkflowExtension;
import io.temporal.worker.Worker;


public class BackgroundCheckBoilerplateWorkflowTest {

  // Use JUnit Extensions to simplify the creation of the test environment.
  // This creates an environment and registers the Workflow to a Worker for testing.
  // If you would rather set this up yourself, look into TestWorkflowEnvironment
  @RegisterExtension
  public static final TestWorkflowExtension testWorkflowExtension = TestWorkflowExtension
      .newBuilder().setWorkflowTypes(BackgroundCheckBoilerplateWorkflowImpl.class)
      .setDoNotStart(true).build();

  @Test
  public void testSuccessfulBackgroundCheckBoilerplateWithMocks(TestWorkflowEnvironment testEnv,
      Worker worker, BackgroundCheckBoilerplateWorkflow workflow) {

    // Create a mock object of your Activities
    BackgroundCheckBoilerplateActivities mockedActivities =
        mock(BackgroundCheckBoilerplateActivities.class, withSettings().withoutAnnotations());

    // Specify what value should be returned when a specific Activity is invoked.
    // Your Activity must have the same method name here as it would within your Workflow
    when(mockedActivities.ssnTraceActivity("555-55-5555")).thenReturn("pass");

    // Register the Workflow's Activities with the Worker provided by the Extension
    worker.registerActivitiesImplementations(mockedActivities);

    // Start the test environment
    testEnv.start();

    // Request execution of the backgroundCheck Workflow
    // This will execute your Workflow, calling the Mocked Activities in place
    // of your actual implementation of the Activities.
    String pass_output = workflow.backgroundCheck("555-55-5555");

    assertEquals("pass", pass_output);

  }
}
First, register your Workflow with the TestWorkflowExtension. To test using mocked Activities, create a mock object of your Activity class. Mock the Activity method so that when a specific value is passed it returns a specific result. Then register the mocked Activities with the Worker, start the test environment, invoke your Workflow, and assert that the results are what you expected.
Testing Workflow and Activity together (Integration Testing)
This example tests a complete Workflow by invoking the Activities the Workflow calls - it is, in reality, an integration test. Integration testing is useful for ensuring the complete success of your entire Workflow, but any downstream dependencies of the Activities must be online for the testing.
import static org.junit.jupiter.api.Assertions.assertEquals;
import org.junit.jupiter.api.Test;
import org.junit.jupiter.api.extension.RegisterExtension;
import io.temporal.testing.TestWorkflowEnvironment;
import io.temporal.testing.TestWorkflowExtension;
import io.temporal.worker.Worker;


public class BackgroundCheckBoilerplateWorkflowIntegrationTest {

  // Use JUnit Extensions to simplify the creation of the test environment.
  // This creates an environment and registers the Workflow to a Worker for testing.
  // If you would rather set this up yourself, look into TestWorkflowEnvironment
  @RegisterExtension
  public static final TestWorkflowExtension testWorkflowExtension = TestWorkflowExtension
      .newBuilder().setWorkflowTypes(BackgroundCheckBoilerplateWorkflowImpl.class).setDoNotStart(true).build();

  @Test
  public void testSuccessfulBackgroundCheckBoilerplate(TestWorkflowEnvironment testEnv, Worker worker,
      BackgroundCheckBoilerplateWorkflow workflow) {

    // Register the Workflow's Activities with the Worker provided by the Extension
    worker.registerActivitiesImplementations(new BackgroundCheckBoilerplateActivitiesImpl());

    // Start the test environment
    testEnv.start();

    // Request execution of the backgroundCheck Workflow
    // This will execute your entire Workflow, along with every Activity the
    // Workflow calls
    String output = workflow.backgroundCheck("555-22-3333");

    // Check for the expected return value
    assertEquals("pass", output);
  }
}
We recommend either having an entirely separate testing environment for testing your Workflows, or testing your Workflow and Activity code in isolation, as detailed above.
Get notified when we launch new educational content
New courses, tutorials, and learning resources - straight to your inbox.